
Sloan Regal and Old Style Royal (Before 1998) Flushometer Parts Breakdown and Troubleshooting Guide
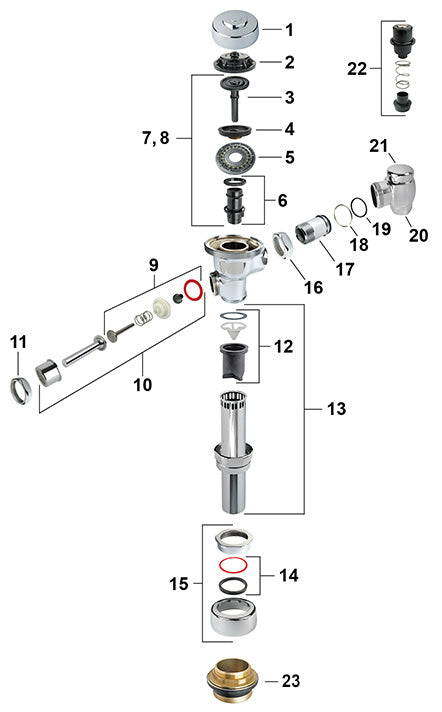
- 1. #08049 - A72 - Chrome Plated Cover
- 2. #08050 - A71 - Inside Cover
- 3. #08004 - A19AC - Closet Relief Valve (White)
#08005 - A19AU - Urinal Relief Valve (Black)
#08052 - A19ACM - Closet Relief Valve Brass (Old Style)
#08345 - A19ALC - Low Consumption Relief Valve (Green)
#08053 - A19AUM - Urinal Relief Valve Brass (Old Style) - 4. #08003 - A15A - Molded Disc
- 5. #08002 - A156A - Diaphragm (Common)
#08051 - A56A - Diaphragm (Old Style) - 6. #08006 - A163A - Adjustable Guide (Standard)
#08252 - A152A - Adjustable Guide (3.5 GPF Closet)
#08348 - A151A - Adjustable Guide (1.6 GPF Closet)
#08349 - A155A - Adjustable Guide (1.0 GPF Urinal) - 7. #08000 - A38A - Diaphragm Assembly (3.5 GPF Closet)
#08571 - A44A - Diaphragm Assembly (2.4 GPF Closet)
#08114 - A41A - Diaphragm Assembly (1.6 GPF Closet) - 8. #08001 - A37A - Diaphragm Assembly (1.5 Urinal)
#08115 - A42A - Diaphragm Assembly (1.0 Urinal) - 9. #08007 - B50A - Handle Repair Kit (Plastic)
#08043 - C64A - Handle Repair Kit (Brass) - 10. #08008 - B32A - Chrome Plated Handle Assembly
#08069 - B73A - ADA Handle Assembly
- 11. #08054 - A6 - Chrome Plated Handle Nut
- 12. #08012 - V551A - Vacuum Breaker Repair Kit
- 13. #08014 - V500AA - 1-1/2" x 9" Chrome Plated Closet Vacuum Breaker
#08015 - V500AA - 1-1/4" x 9" Chrome Plated Urinal Vacuum Breaker
#08016 - V500AA - 3/4" x 9" Chrome Plated Urinal Vacuum Breaker - 14. #08020 - 1-1/2" Spud Coupling Gasket Kit for Closet
#08021 - 1-1/4" Spud Coupling Gasket Kit for Urinal
#08022 - 3/4" Spud Coupling Gasket Kit for Urinal - 15. #08017 - F5AT - 1-1/2" Spud Coupling Assembly
#08018 - F5AU - 1-1/4" Spud Coupling Assembly
#08019 - F5AW - 3/4" Spud Coupling Assembly - 16. #08040 - H550 - Tailpiece Coupling Nut
- 17. #08039 - H551A - Adjustable Tailpiece 2-1/16" (Other Lengths Available)
- 18. #08038 - H552 - Locking Ring
- 19. #08037 - H553 - O-Ring
- 20. Click Here for Control Stops - Control Stop
- 21. Click Here for Stop Covers - Chrome Plated Stop Covers
- 22. #08033 - H543ASD - 3/4" Control Stop Repair Kit
#08032 - H541ASD - 1" Control Stop Repair Kit - 23. #08023 - 1-1/2" Spud Assembly
#08024 - 1-1/4" Spud Assembly
#08025 - 3/4" Spud Assembly
What's the difference between Old Style Royal Flushometers made before 1998, and New Style Royal Flushometers made after 1998?
Troubleshooting Q&A
Below is a Troubleshooting Q&A Guide for Royal Flushometers made before 1998 from Sloan. The guide highlights the most commonly occurring problems and how to go about fixing them. As always you can call us for assistance or if you need to replace a part and/or unit.
1
PROBLEM:
Valve Closes Off Immediately
CAUSE:
A) Ruptured or damaged diaphragm.
B) Enlarged by-pass orifice from corrosion or damage.
SOLUTION:
A&B) Install new diaphragm or inside parts kit to correct above problems and update flushometer.
2
PROBLEM:
Leaking at Handle Assembly
CAUSE:
A) Handle seal may have deteriorated.
B) Handle gasket has been omitted.
C) Valve is old style and handle packing is worn.
SOLUTION:
A) Install new seal or handle repair kit.
NOTE: The handle seal will easily slide right onto the bushing if it is wet.
B) Install handle gasket.
C) Install handle repair kit.
3
PROBLEM:
Length of Flush too short
CAUSE:
A) Diaphragm assembly and guide assembly are not hand tight.
B) Enlarged by-pass orifice from corrosion or damage.
C) Black urinal relief valve in closet flushometer.
D) Low consumption kit installed in non-low consumption fixture.
SOLUTION:
A) Screw the two assemblies hand tight.
B) Install diaphragm or inside parts kit.
C) Install proper white closet relief valve.
D) Replace with proper inside parts kit.
4
PROBLEM:
Length of flush too long or fails to close off
CAUSE:
A) Relief valve is not seating properly or by-pass orifice is clogged because of foreign material, or by-pass orifice is closed by an invisible gelatinous film from “overtreated" water.
B) Line pressure has dropped and is not sufficient to force relief valve to seat.
C) White closet relief valve has been used in a urinal valve.
SOLUTION:
A) Disassemble the working parts and wash thoroughly. NOTE: Size of the orifice in the by-pass is of utmost importance in the proper metering of water into the upper chamber of the valve. Do not enlarge or damage this orifice. Replace inside kit if cleansing does not correct problem.
B) Shut off all control stops until pressure has been restored, then open them again.
C) Replace with black urinal relief valve.
5
PROBLEM:
Insufficient volume of water to adequately siphon fixture
CAUSE:
A) Control stop not open enough.
B) Urinal valve parts inside a closet valve.
C) Low consumption valve installed on a non-low consumption valve fixture.
D) Water saver kit installed in old, non-water saver bowl.
E) Inadequate volume or pressure at supply.
SOLUTION:
A) Adjust control stop for desired delivery of water.
B) Replace inside urinal parts with proper closet valve parts.
C) Replace with proper inside parts kit.
D) Position refill head on guide so that side 1 is in up position.
E) If no gauges are available to properly measure supply pressure or volume of water at the valve, then completely remove the entire diaphragm assembly and open control stop to allow water to pass through the empty valve. If the supply is adequate to supply the fixture in this manner, then the restriction ring (A-164 on plastic guides) should be removed from the bottom of the guide to provide additional flow. If additional flow is still required, the refill head (A-170) may be replaced with a brass low flow refill head (A-85). Should neither of these steps prove satisfactory, then steps should be taken to increase the pressure and/or supply.
6
PROBLEM:
Leaking at top of vacuum breaker
CAUSE:
A) Rubber vacuum breaker boot or gasket has deteriorated.
SOLUTION:
A) Install new vacuum breaker repair kit.
7
PROBLEM:
Leaking at bottom of vacuum breaker tube or around coupling
CAUSE:
A) Coupling gaskets have deteriorated .
B) Spud washer and/or spud have deteriorated.
SOLUTION:
A) Install proper new coupling gasket kit.
B) Install proper new spud washer and/or complete new spud assembly.
8
PROBLEM:
Leaking between valve and control stop
CAUSE:
A) “O" ring and/or locking ring have deteriorated.
SOLUTION:
A) Replace “O" ring and locking ring simultaneously.
9
PROBLEM:
Chattering noise in Flushometer
CAUSE:
A) Diaphragm has been installed upside down.
B) Inside cover has become distorted from freezing or abuse.
SOLUTION:
A) Replace the segment diaphragm to the proper position as instructed by markings on the diaphragm.
B) Replace inside cover.